Batch import Lessons and Topics to LearnDash (for free)
By Enrique Zabala - updated july 27, 2022
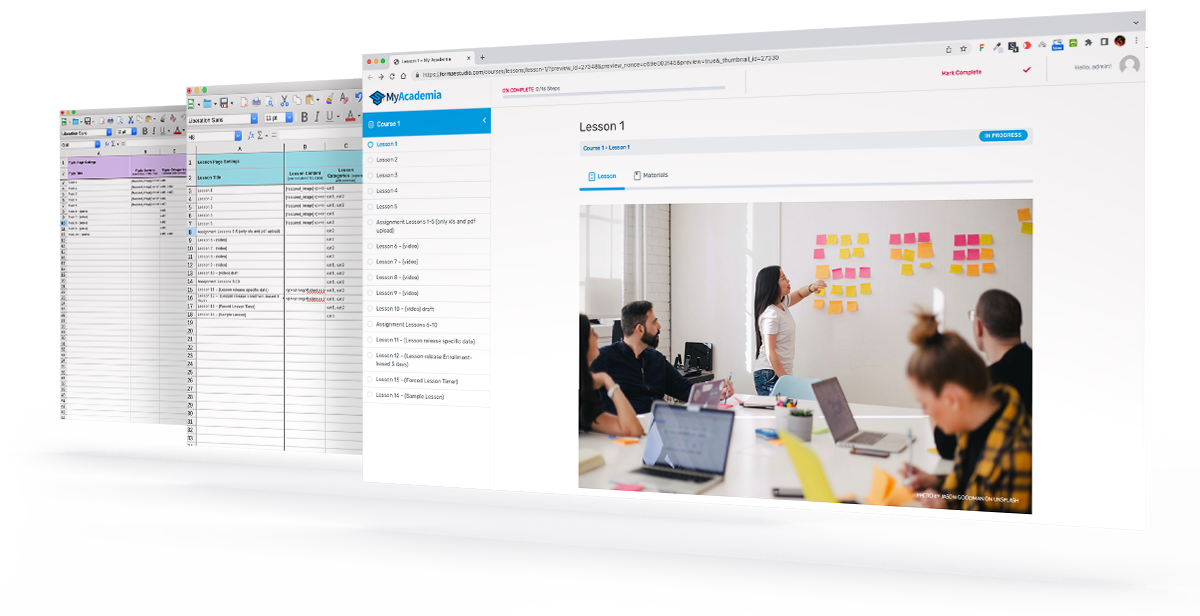
Importing Lessons
First I will explain how to batch import lessons. We’ll be using an example spreadsheet with 14 lessons that you can download to test this method. Included is also a folder with some materials and featured images:

- Create a course in LearnDash
The first step is to create and publish a new empty course in LearnDash. (WordPress dashboard » LearnDash LMS » Courses » Add New » (give it a name) » Publish)
- Fill in the spreadsheet
Open the file “Import-Learndash-LESSONS-v1.0-example.ods” in LibreOffice. It contains 3 tabs or spreadsheets; the first two (general and lessons) are the ones that has to be filled in, and the last one (lessons-save-a-copy-as-cvs) has to be exported to CSV format.
Tab 1: “general” spreadsheet:
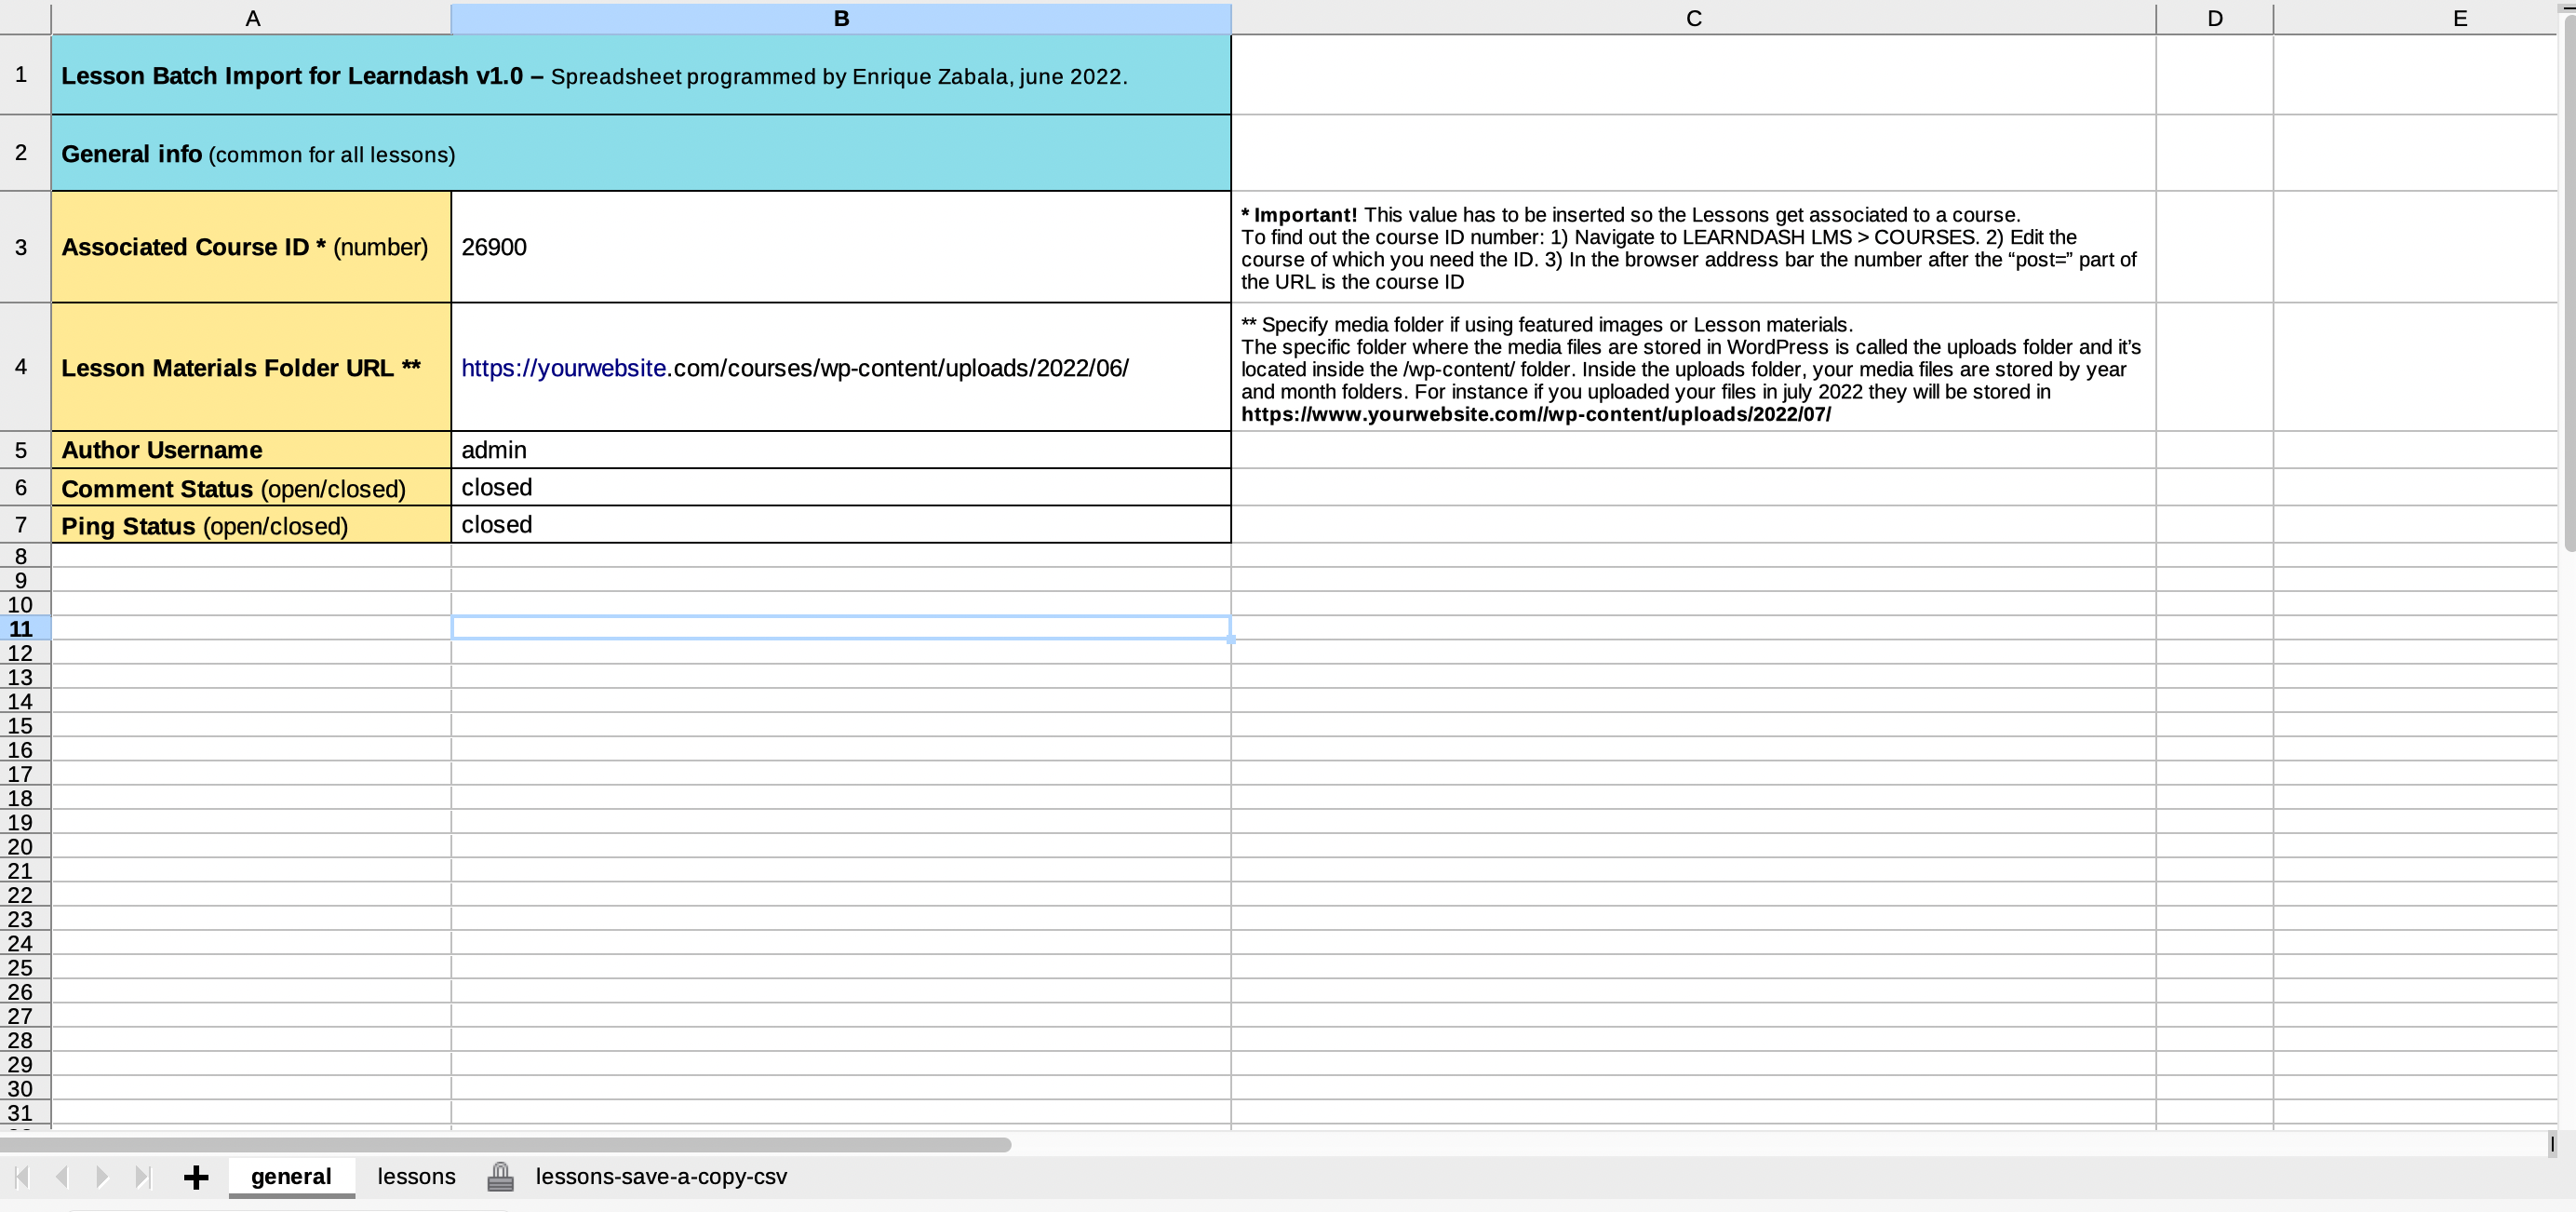
Here is where you insert the common info for all lessons. To the right there are texts explaining how to find the Associated Course ID (the course created in step 1) and the Lesson Materials Folder URL.
Tab 2: “lessons” spreadsheet:
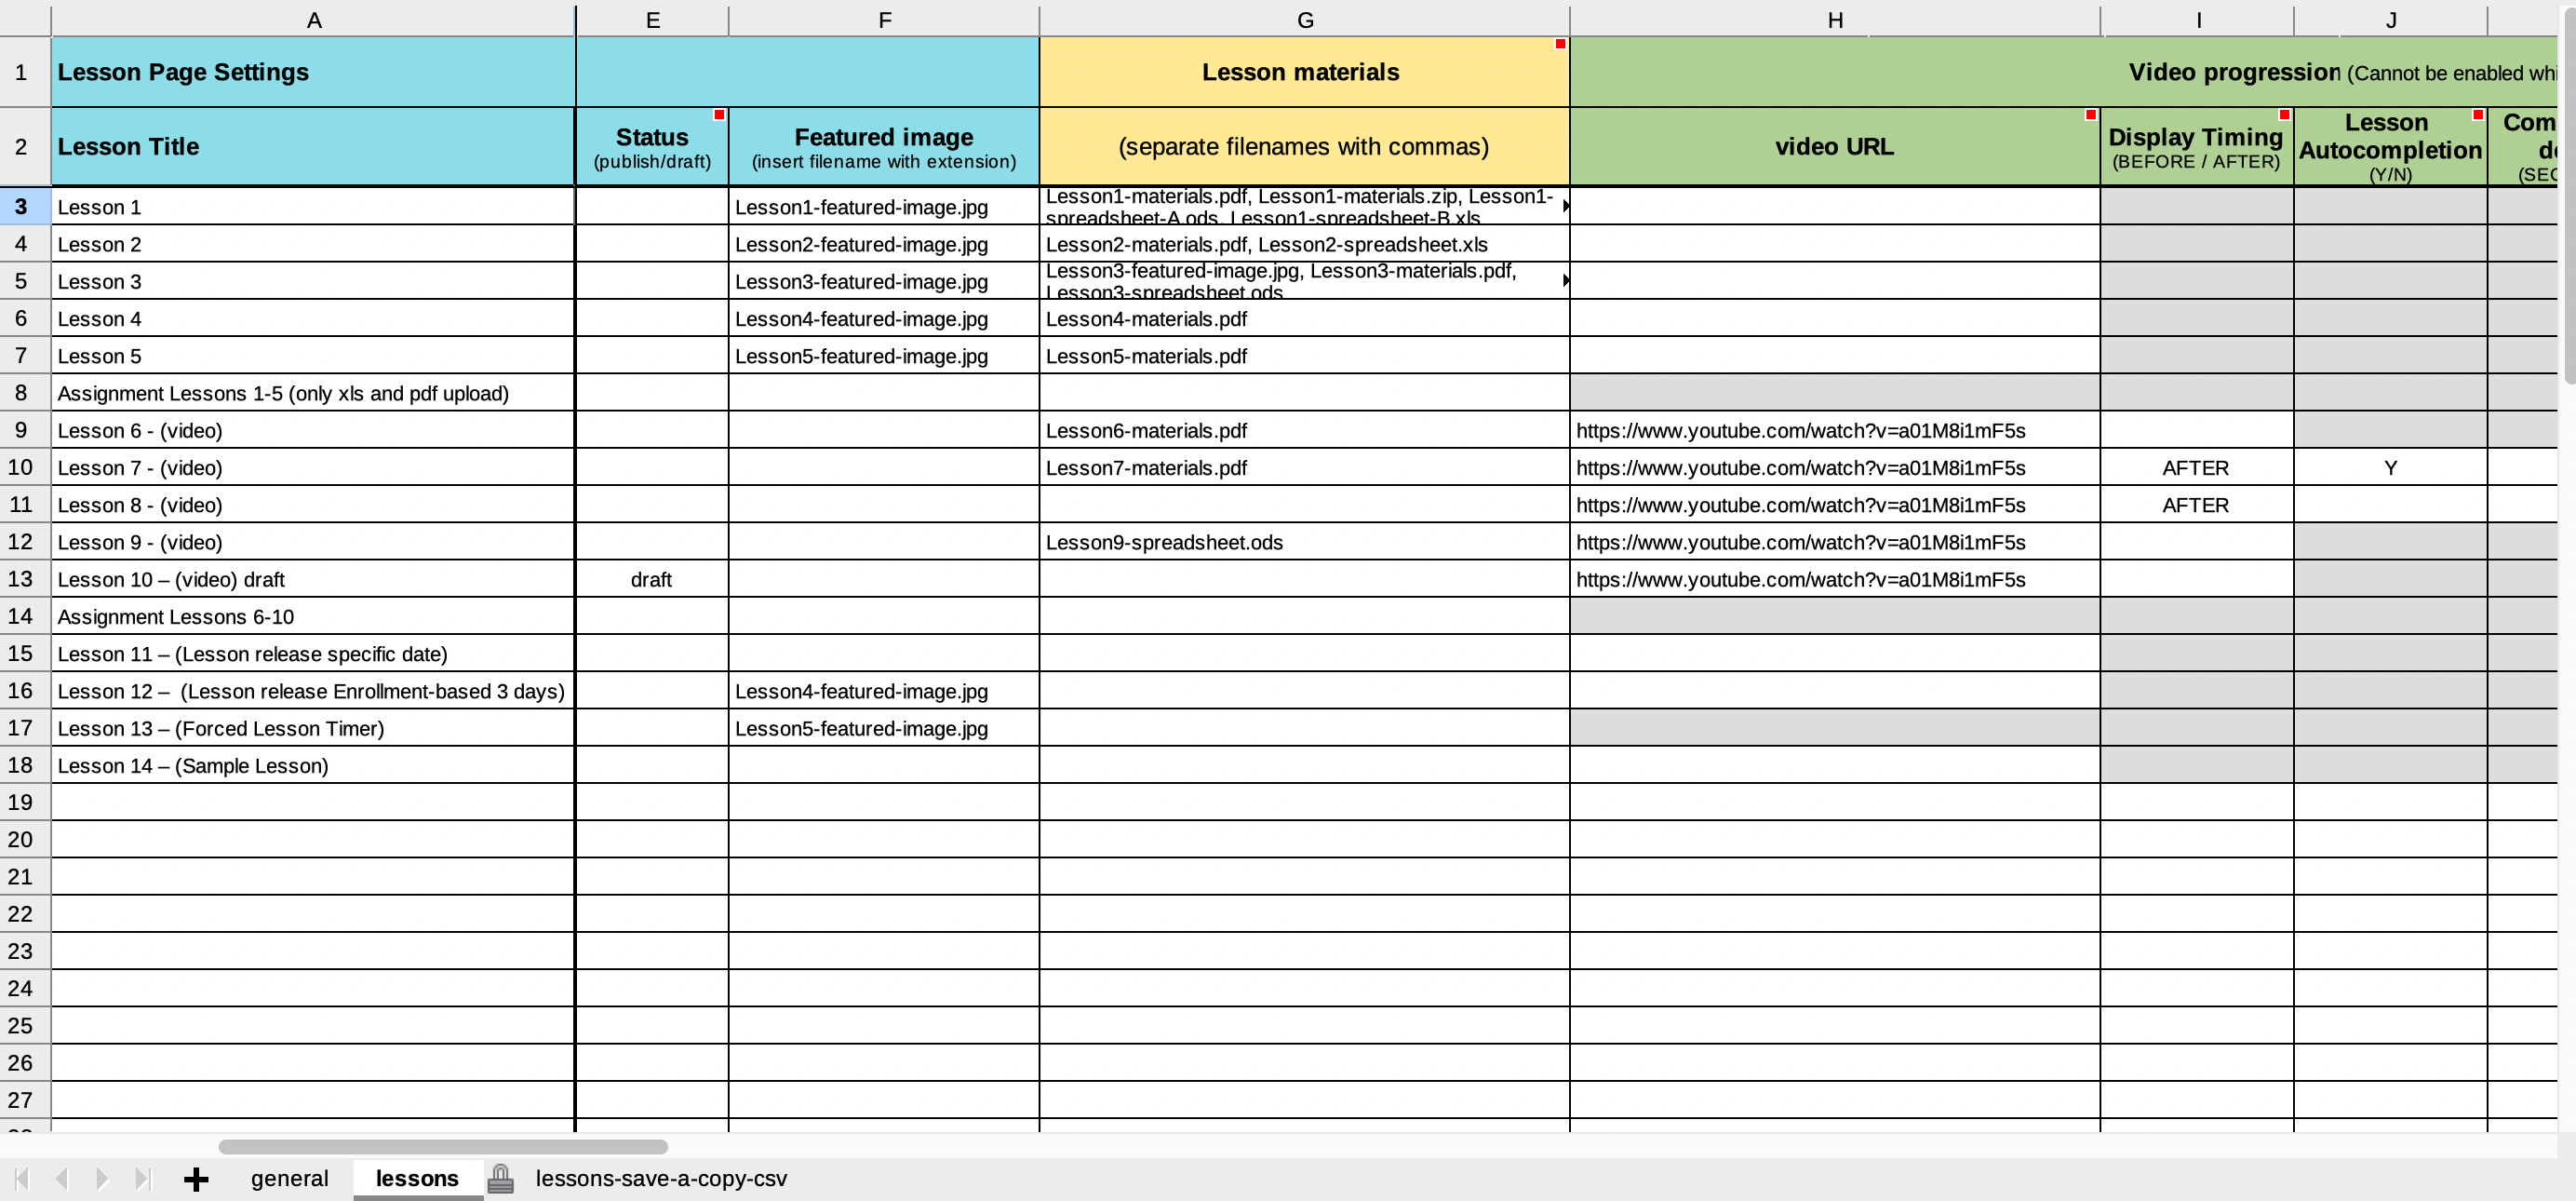
Every row (starting from row 3) in the lessons tab spreadsheet corresponds to one lesson. You have to give the lesson a name in the first column “Lesson Title” so it can be imported to wordpress. There is place for up to 49 lessons in total.
Tooltip explanations – Some of the header cells contain a red square in the top right corner. If you hover over the cell with the mouse pointer, a tooltip appears which contains a small explanation about that specific setting. They are all copied from the LearnDash Lesson page. Most of the tooltips also specify if there’s any default value used for that setting. For instance, all cells that can receive “Y” or “N” values (columns J, L, M, N etc.) have a default value of “N” if the cell is left blank. This is to avoid having to fill in so many cells.


In the example above we use the Video Progression feature for a specific lesson by inserting the video URL in column H. You will see that the cells belonging to Assignment uploads and Lesson Timer in that same row will become gray, indicating no info must be inserted there.
Once the spreadsheet is filled in and ready for exporting, it’s important that all cells with gray background are empty, or the lessons won’t import correctly to LearnDash.
Note: In the the “lessons” tab of the example spreadsheet you will see that the Lesson Content (column B) for lessons 1 to 5 start with a “[featured_image]” shortcode. If you want this shortcode to display the featured image inside the lesson page, you’ll have to add the following PHP code at the end of your functions.php file (WordPress dashboard » Appearance » Theme File Editor » Theme Functions):
function my_post_featured_img($atts) {
global $post;
return '<img src="' . get_the_post_thumbnail($post->ID);
}
- Export the CSV file
Select the third tab (lessons-save-a-copy) and from the file menu select save a Copy… » File type: Text CSV » Save
- Upload Lesson materials and Featured images
- Import the lessons to LearnDash

Once activated we have to upload the import presets so the fields from the CSV file gets imported to the correct locations in the database:
To load the presets: from the wordpress dashboard select WP Imp Exp » Settings » Choose file » (select “import-LD-lessons-settings.txt” from your computer) » Import.

Select New Import from the “WP Imp Exp” menu and follow these steps:
Step 1: Select the CSV file you just exported from LibreOffice. Press “Continue to step 2”.
Step 2: From the dropdown menu select Lesson. Press “Continue to step 3”.
Step 3: Press “Continue to step 4”.
Step 4: From the Load settings dropdown menu select “import-LD-lessons”. Press “Continue to step 5”.
Step 5: Under the “Update Existing items Fields” tab select “Update All data”. Press “Continue to step 6”.
Step 6: Press “Confirm & Run Import”.
Ready!
Importing Topics
The Topic .ods spreadsheet works exactly the same as the Lessons spreadsheet, only that we need to fill in one additional column with the associated Lesson ID’s, so it’s a bit more work.
We’ll do it simple and import 5 topics each into lessons 1 and 2 created in the previous Lesson batch import.
“topics” spreadsheet:

Follow the same steps as for importing lessons. When making a new import with the “WP Import Export Lite” plugin, in step 2 select Topic from the dropdown menu, and in step 4 select the Topic import preset (remember to upload the “import-LD-topics-settings.txt” first).
- From the “WP Imp Exp” menu select New Export.
- Select Lesson from the dropdown menu.
- Under the “Add filtering options” section, copy&paste these values (use the same course ID number as when importing the lessons): Element: course_id Rule: equals Value: (insert the associated course ID number)
- Press the “+”.
- Press “Export” button.
- Download the resulting CSV file and open it in LibreOffice Calc. You will find all Lesson IDs under the “ID” column.
That's it!
And here’s the Topic import video: